Best Practices for Pruning Trees Starts with the Right Tools
To prune properly, start by choosing the right tools for the job. Protect yourself by using proper safety equipment—working without it can be just as risky as using a dull blade. Include your safety gear in your toolkit so you use it every time you prune.
Review the list below to make sure you have the proper tools to implement best practices for pruning trees and shrubs in your New England landscape.
- Eye Protection – Not only should you worry about getting poked in the eye by a branch but also falling sawdust while making a cut.
- Gloves– Many self-inflicted injuries while making pruning cuts come from pruning snip blades encountering the left wrist.
- Hand Pruners– can be used when making cuts that are .25” – 1” in diameter.
- Loppers- can be used when making cuts that are .5”-1” in diameter. They are often easier to use in some circumstances than a handsaw. Loppers can cause splitting if the branch is too large for the lopper
- Pole Pruners- generally they have a blade that is comparable in size to that of a lopper but allows you to get further into a tree without the need of a ladder. They often come with interchangeable heads where you can swap out a lopper for a saw.
- Handsaws- allow for larger cuts to be made without causing damage. Usually recommended for cuts that are 1”– 3” in diameter.
- Chainsaws– Any cuts that are 2” and greater.
- Ladder– Depending on the height of your tree you may need to use a ladder, especially if you do not have pole extensions. *Most homeowner accidents occur when using a ladder. Whenever possible use pole extensions. Never ever use a chainsaw on a ladder.
Pruning Cuts
Pruning Cut Placement
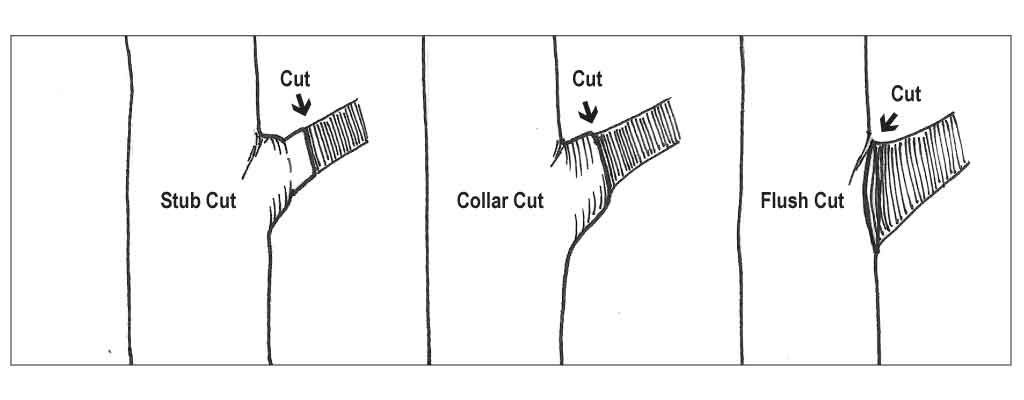
Pruning cuts follow the Goldilocks principle. Don’t cut too far from the stem, and don’t cut too close. Make the cut just right so the tree can heal properly and quickly. The images below show what that means.
Stub Cut (TOO LITTLE):
You create a stub cut when you cut too far away from the branch collar. The tree must grow for a long time to compartmentalize the wound. This process requires extra energy and leaves the tree vulnerable to infection for a longer period.
Collar Cut (JUST RIGHT):
Make your cut just outside the branch collar. This area contains the highest concentration of cells responsible for wound closure, a process known as Compartmentalization of Decay in Trees (CODIT).
Flush Cut (TOO MUCH):
You make a flush cut when you remove too much or all of the branch collar and cut into the trunk. This removes many of the cells the tree needs to close the wound, can lead to extensive decay, and often results in the tree’s death.
Angle of Cut
You may face a small debate when making pruning cuts: should you angle the cut to help water run off, or should you make the cut with the smallest possible surface area? I prefer to make cuts with less surface area because they allow the tree to heal more quickly. However, surrounding branches sometimes make that impossible.
Whether you angle the cut or not, the most important rule is this: do not cut into the branch collar
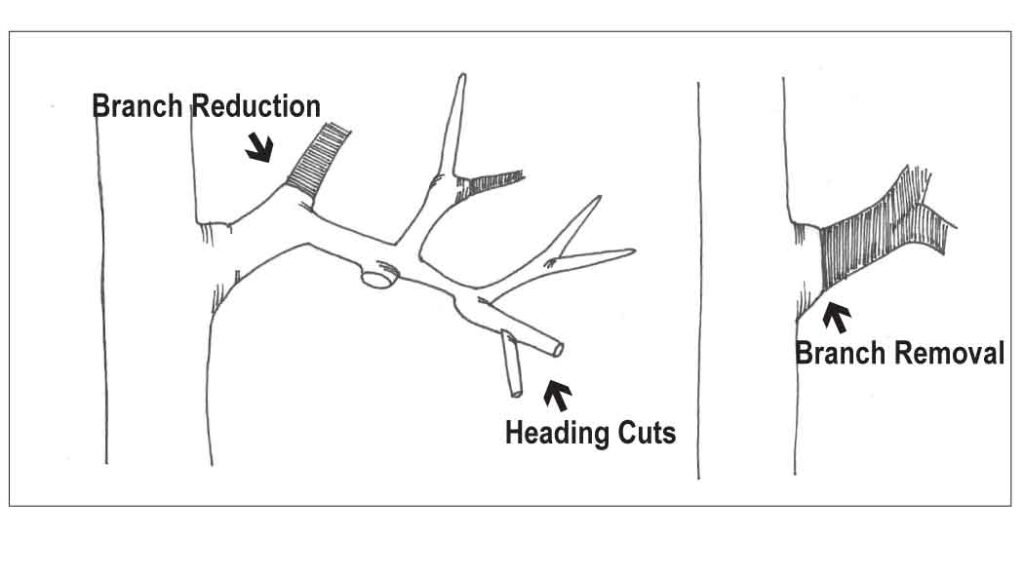
Types of Pruning Cuts an Arborist would make in New England
Branch Removal: Remove the entire branch back to the main stem.
Branch Reduction: Reduce the length of a branch by cutting it back to a lateral branch that is large enough to assume the terminal role—typically at least one-third the diameter of the branch at the point of attachment.
Heading Cuts: Avoid heading cuts whenever possible. Make these cuts between nodes or buds. Arborists sometimes use them after storm damage, but they often stimulate a profusion of new shoots near the cut.
Order of Pruning Cuts
Diseased, Broken, & Dead:
Remove all dead and broken branches, and eliminate any diseased wood. Look for staining on the stems as a sign of disease. If you notice staining, consult an arborist.
Determine the Lowest Branch:
Decide where you want the lowest permanent branch based on the tree’s age and intended use of the space (for example, allowing room for mowers). Remove branches below that point. If the tree is young, you can subordinate (reduce back to a lateral branch) the lowest branches now and remove them in a season or two once the tree has developed more leaves.
Reduce or Remove Codominant Leaders:
Identify leaders with a 1:1 aspect ratio. Reduce or remove one of the competing leaders. In most cases, reduction works best because it creates a smaller-diameter cut and preserves more structural options for the future.
Clustered Branching:
Thin out clusters of branches to improve structural integrity. When several branches grow very close together, remove selected branches within the cluster. As the tree matures, tightly spaced branches can grow into one another, form weak unions, and increase the likelihood of failure.
Remove Crossing or Rubbing Branches:
Remove branches that grow into or rub against each other. These branches can create wounds, invite decay, or even fuse together (as seen in some species such as beech and yew). Since not all trees fuse successfully, remove these branches to reduce the risk of structural failure.
Sprouts:
Manage sprouts carefully. Their presence often indicates stress. Remove one-third of the sprouts, reduce one-third, and leave one-third. If sprouts appear at the base of the tree, grafting or wounding may have triggered them. In some cases, a root zone excavation may help determine whether you can reduce their occurrence.
Important:
If you prune your own tree, never remove more than 25% of the canopy during a single growing season. Removing too much foliage can reduce energy production and lead to decline or premature death. If your tree requires heavy pruning, consult an arborist.